Thursday 31 January 2019

warning for ESXi Shell and SSH appear on an ESXi 5.x and 6.x

After Enable SSH and Shell ESXi hosts shows Suppressing Warnings.


it’s maddening to see yellow warnings and banners on hosts in the vCenter Server inventory 


As you can see in the above screenshot, there are separate alerts for both the ESXi Shell and for SSH as well as an option to ‘Suppress Warning’ on each. 

Although it may appear that each can be suppressed independently, clicking one of the ‘Suppress Warning’ links will disable both ESXi Shell and SSH warnings on the host.
When clicking this, you’ll see a warning pop-up as shown below.

suppressshell-3

After clicking Yes, you’ll see the warnings disappear after the vSphere Web Client refreshes.

Also follow below steps:

To disable these warnings using vSphere Client:
  1. Select the ESXi host from the Inventory.
  2. Click the Configuration tab.
  3. Click Advanced Settings in the Software menu.
  4. Navigate to UserVars > UserVars.SuppressShellWarning.
  5. Set the value from 0 to 1.
  6. Click OK.
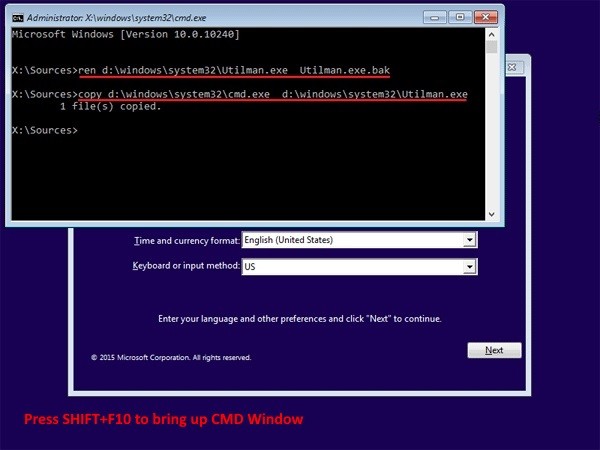
To disable these warnings using esxcli:
  1. Connect to the ESXi host through SSH using root credentials.
  2. Run this command:

    vim-cmd hostsvc/advopt/update UserVars.SuppressShellWarning long 1

Wednesday 30 January 2019

How to enable SSH and Shell on vmware

In some cases System Administrator or vmware admin we cann't work every time vmware direct console.

Ok. Now how to enable SSH and Shell on vmware esxi. Here will go 3 method.


  1. Direct Console user interface
  2. Enabling ESXi Shell& SSH access using the vSphere Client
  3. Enable Vcenter web client

Method 1:
Direct Console :

Follow below steps:

  1. Press F2 Button on vmware
  2. Select " Troubleshooting Options"
  3. Select "Enable Esxi Shell " just press Enter
  4. Select  "Enable SSH" and just press Enter


Method 2:

Enabling ESXi Shell&SSH access using the vSphere Client


  1. Log in to a Host Client using ip address of the host in a browser
  2. Click on Manage under Navigator section
  3. Click the Services tab
  4. In the Services section, select TSM from the list:
  5. Click Actions and select Start to enable the ESXi shell.


Method 3:

SSH and Shell enable using V Center web Client

  1. Log in to a vCenter Server system using the vSphere Client.
  2. Select the host in the Inventory panel.
  3. Click the Configuration tab and click Security Profile.
  4. In the Services section, click Properties.
  5. Select ESXi Shell from this list:

    ESXi Shell
    SSH
    Direct Console UI

  6. Click Options and select Start and stop manually.

    Note: When you select Start and stop manually, the service does not start when you reboot the host. If you want the service to start when you reboot the host, select Start and stop with host.
  7. Click Start to enable the service.
  8. Click OK.


ESXi Domain Login - Permission to perform this operation was denied

I have a system running ESXI 6.5, I can login with the main root login password is fine, I added it to my domain like usual with no problems, When i try  to login it with root id says " permission to perform this operation was denied" 


I did some searching online and they said check lockdown mode, which is disabled. i just remember when i install vcenter server on windows enabled "Lockdown mode is disabled"


Solution:

Follow these steps to resolve the issue:
  1. Open the Direct Console User Interface (DCUI) on the host.
  2. Press F2 for Initial Setup.
  3. Select Configure Lockdown Mode and disable lockdown mode.


Sunday 27 January 2019

How to Reset/unlock Windows Password


If you forget your password on a Windows PC or maybe locked  your account and you cannot access computer its really typical processes, you can use this moderately straightforward routine.
We have two method solve this problem.
  1. Microsoft Windows utilman.exe menthod 
  2. and Third party (my recommendation always Hiren boot cd https://www.hirensbootcd.org/download/
Method 1

Boot from the Windows 10 DVD. Make sure that your PC setup is configured to boot from a DVD and that UEFI and Secure Boot are disabled.

Boot from Windows 10 DVD

Press SHIFT + F10 to open a command prompt.

Open a command prompt with SHIFT F10

find Operating system installed location Drive.

My Drive name here D Drive.


  1. Type ren d:\windows\system32\utilman.exe utilman.exe.bak and press the ENTER key
  2. copy d:\windows\system32\cmd.exe d:\windows\system32\utilman.exe 


Exit the Windows  setup (just power down)

Boot normally to your hard drive.

At the Login Screen click the EASE OF ACCESS icon (beside the Power icon in the bottom right corner of the screen).Because of step reset-windows-10-password-create-admin4, this will launch a CMD windows

Just type compmgmt.msc

Select Local user and Groups 

Now u can change or Create New Users.


I cannot delete Hyper-V Checkpoint

Unable to delete checkpoints for a production server. As per the below screenshot it is showing  backups. How can we delete the checkpoints in this case?

I have encountered this on Hyper-V running on a Windows Server 2012 R2 Datacenter. My Backup Job was failed then noticed a it broken recovery checkpoints for a virtual machine that was created by Hyper-V.


Notice that the options to Delete Checkpoint and Delete Checkpoint Subtree are missing in the above screenshot. Here’s what the options are for a standard checkpoint.

Solution:

To delete a checkpoint in Hyper-V, use the following instructions. The script should work on Hyper-V installed on any operating system, e.g. Windows Server 2008, Windows Server 2012, Windows Server 2016, Windows 10, etc.

1. Start PowerShell run as Administrator mode on the computer where the virtual machine is located. 

2. Type the following command and press Enter. 

Ex: Get-VMSnapshot -VMName ADDC02 | Remove-VMSnapshot 

ADDC02 - my virtual Machine Name

If you are working remote computer follow below command

Ex: Get-VMSnapshot –computername HYPERV01 -VMName ADDC02 | Remove-VMSnapshot 

HYPERV01 – My windows 2012 R2 Data Center Server.


3. Hyper-V will start the merge process in the Hyper-V Manager. Depending on the size of the virtual hard disk, the merge process may take some time so be patient.

Thursday 24 January 2019

What is Active Directory FSMO Roles

Active Directory is the central repository in which all objects in an enterprise and their respective attributes are stored. It is a hierarchical, multi-master enabled database, capable of storing millions of objects. Because it is multi-master, changes to the database can be processed at any given domain controller (DC) in the enterprise regardless of whether the DC is connected or disconnected from the network.

Active Directory has five special roles which are vital for the smooth running of AD as a multi master system. Some functions of AD require there is an authoritative master to which all Domain Controllers can refer to. These roles are installed automatically and there is normally very little reason to move them, however if you De-commission a DC and DCPROMO fails to run correctly or have a catastrophic failure of a DC you will need to know about these roles to recover or transfer them to another DC.

The forest wide roles must appear once per forest, the domain wide roles must appear once per domain
Microsoft split the responsibilities of a DC into 5 separate roles that together make a full AD system.


  1. Schema Master – one per forest
  2. Domain Naming Master – one per forest
  3. Relative ID (RID) Master – one per domain
  4. Primary Domain Controller (PDC) Emulator – one per domain
  5. Infrastructure Master – one per domain


FSMO Roles: What do They do?

Schema Master: The Schema Master role manages the read-write copy of your Active Directory schema. The AD Schema defines all the attributes – things like employee ID, phone number, email address, and login name – that you can apply to an object in your AD database.

Domain Naming Master: The Domain Naming Master makes sure that you don’t create a second domain in the same forest with the same name as another. It is the master of your domain names. Creating new domains isn’t something that happens often, so of all the roles, this one is most likely to live on the same DC with another role.

RID Master: The Relative ID Master assigns blocks of Security Identifiers (SID) to different DCs they can use for newly created objects. Each object in AD has an SID, and the last few digits of the SID are the Relative portion. In order to keep multiple objects from having the same SID, the RID Master grants each DC the privilege of assigning certain SIDs.

PDC Emulator: The DC with the Primary Domain Controller Emulator role is the authoritative DC in the domain. The PDC Emulator responds to authentication requests, changes passwords, and manages Group Policy Objects. And the PDC Emulator tells everyone else what time it is! It’s good to be the PDC.

Infrastructure Master: The Infrastructure Master role translates Globally Unique Identifiers (GUID), SIDs, and Distinguished Names (DN) between domains. If you have multiple domains in your forest, the Infrastructure Master is the Babelfish that lives between them. If the Infrastructure Master doesn’t do its job correctly you will see SIDs in place of resolved names in your Access Control Lists (ACL).

Difference of Transferring and Seizing FSMO Roles

Whenever it's possible, you should transfer FSMO roles and do not seize them! Transferring is the recommended and cleaner way. But it requires that the DC, which currently owns the role you want to transfer, is still working and connected to the network. Transferring makes the old DC know that it does not own the role(s) any more.

If the DC is broken (e. g. hardware defect) and will never come back again, then you can seize the role on a remaining DC. It is very important that the old DC will never be connected to the network again, if it is connected again, this will cause conflicts and lead to an inconsistent AD. This is because the old DC will not notice the change and still feel responsible for tasks related to the role.

McAfee Endpoint Encryption 7.0 – Fatal Error: [0xEE0E0001]

Errors Fatal Error [ee000007] Internal initialization error Fatal error: File access error at startup  Fatal error: 0xEE0D0001 - Fail...